How to Put On a Dog Harness Correctly?
Introduction
Getting your dog into a harness might seem simple at first. You grab the straps, pull them over your pup’s head, and clip it shut, right? Not quite. Many dog owners struggle with harness fitting, and honestly, that’s okay. A harness that doesn’t fit right can slip off your dog, hurt their shoulders, or just make your walk miserable for both of you.
The good news? Learning to put on a dog harness correctly takes just a few minutes. Once you nail the technique, you and your dog will have safer, more comfortable walks together. This guide walks you through everything you need to know, from selecting the right harness to fastening it properly.
Why Your Dog’s Harness Fit Matters
Before we jump into the how-to part, let’s talk about why this matters. A harness that doesn’t fit well can cause real problems for your furry friend.
A loose harness lets your dog slip right out of it. You’re walking along the sidewalk, your dog sees a squirrel, and boom—they’re gone. That’s scary and dangerous. A loose harness can also cause your dog to choke if they suddenly lunge and the harness catches around their neck.
On the flip side, a harness that’s too tight restricts your dog’s movement. It can rub their fur the wrong way, cause irritation, and make them uncomfortable. Over time, a tight harness can actually damage their skin and coat.
The perfect harness should give you control during walks while keeping your dog comfortable and safe. When it fits right, your dog can move freely, breathe easily, and you won’t have to worry about them escaping.
Types of Dog Harnesses
Not all harnesses work the same way. Before you learn how to put one on, it helps to know what type you have.
Back-clip harnesses attach the leash at your dog’s back. These are great for dogs that don’t pull too hard. They’re comfy, easy to put on, and give your dog lots of freedom. Most small dogs and well-behaved pups do great with back-clip harnesses.
Front-clip harnesses connect the leash at your dog’s chest. This style gives you more control and helps stop pulling. When your dog lunges forward, the front clip naturally turns their body toward you instead of letting them pull ahead. These work best for strong pullers or dogs still learning leash manners.
No-pull harnesses are designed specifically to prevent pulling. They usually have both front and back clips. These harnesses give you extra control and discourage jumping and tugging during walks.
Vest-style harnesses cover a large area of your dog’s body. They distribute pressure evenly and look stylish. Some have side clips or front clips. These work well for dogs with sensitive skin or those prone to rubbing.
Each type goes on slightly differently, but the basic fitting rules stay the same.
How to Measure Your Dog for the Right Size
Getting the right size is step one. A harness that doesn’t fit won’t work no matter how well you put it on.
Grab a soft measuring tape. If you don’t have one, a piece of string works fine—just measure the string against a regular ruler afterward.
Measure around the widest part of your dog’s chest, right behind their front legs. This is your chest measurement. Next, measure around your dog’s neck. Then, measure from your dog’s neck down to their tail base along the spine.
Check your harness’s sizing chart. Most brands give you measurements for small, medium, and large dogs. Your dog’s chest measurement is usually the most important number. If your dog falls between sizes, go with the larger one. You can always add padding or try a different brand.
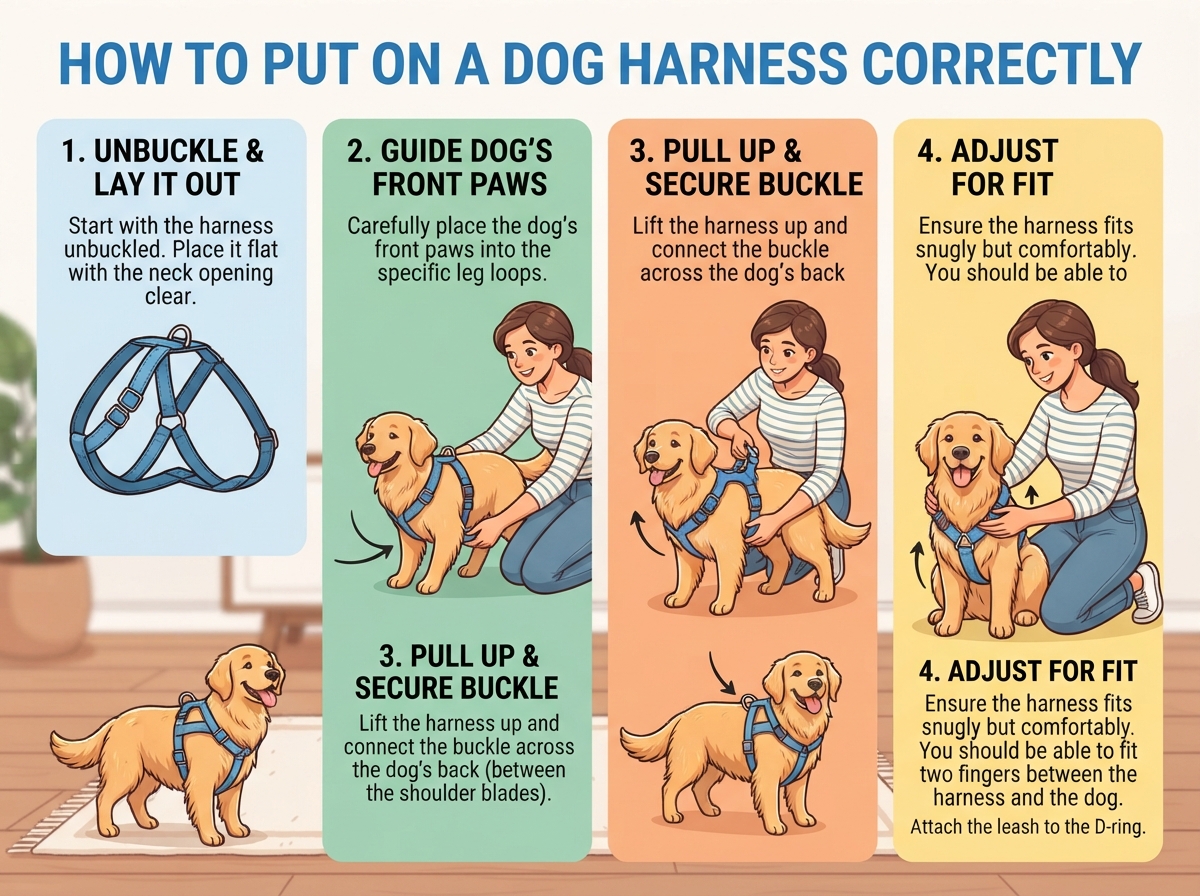
A good rule of thumb: you should be able to slip one or two fingers between the harness and your dog’s skin. If you can’t fit your fingers, it’s too tight. If you can fit more than two fingers, it’s too loose.
Step-by-Step: How to Put On a Back-Clip Harness
Let’s start with the most common type: the back-clip harness.
Step 1: Prepare Your Dog
Have a treat ready. Your dog is going to cooperate better if they know something good happens when you bring out the harness. Put your dog in a sitting position or standing position—whatever works best for you. It helps to have them on a leash or in a contained space so they don’t run off while you’re fitting the harness.
Step 2: Unbuckle All the Straps
Look at your harness. Open every buckle, strap, and clip. The whole thing should lay flat. This makes it way easier to slide onto your dog. You’ll do all the connecting after your pup is in position.
Step 3: Lift the Harness Over Their Head
Gently grasp the harness and bring it up toward your dog’s head. You’re not forcing it on—you’re guiding it. Let your dog sniff and explore the harness first if they’re nervous. Give them a treat while they investigate. This makes the process positive and less scary.
Once they’re ready, gently place the harness opening around their neck. If your dog has a big head or is nervous, you might need to slip one front leg through first, then the other front leg, before getting the neck part secure.
Step 4: Secure the Front Straps
Pull the two front straps around your dog’s chest. These straps should sit snug against their body but not tight. Fasten the buckles on both sides. Start with one side, then move to the other. Make sure both sides are even—a harness that’s pulled to one side won’t work right and won’t be comfortable.
Step 5: Check the Fit
Run your fingers around every part of the harness. Slip a finger or two between the harness and your dog’s skin. You should have room for about one to two fingers. No more, no less. If it’s too tight, loosen the straps a bit. If it’s too loose, tighten them slightly.
Make sure the harness isn’t twisting or riding up on your dog’s body. It should sit flat against their chest and sides.
Step 6: Test the Clip
Gently tug on the harness in different directions. It shouldn’t shift or slide. Your dog should be able to sit, stand, and lie down without any restriction. Try a few steps with your pup to make sure everything feels right.
Step-by-Step: How to Put On a Front-Clip Harness
Front-clip harnesses take a little more work because of the front attachment point.
Step 1: Open All the Straps
Like with the back-clip, open everything up. Lay the harness out flat so you can see all the pieces.
Step 2: Slip On the Harness
You might need to approach this differently depending on your harness design. Some front-clip harnesses open completely like a jacket. Slip your dog into it just like you’d slip a shirt over their head. Other styles have an over-the-head design with a belly band that connects underneath.
If it’s the over-the-head type, guide the harness over your dog’s head, then slip their front legs through the side openings.
Step 3: Connect the Belly Band
Pull the belly strap under your dog’s belly. This strap should sit in the middle of their chest area, not too far forward and not too far back. Connect the buckle on the underside. Make sure it’s snug but not tight.
Step 4: Fasten the Neck Strap
Connect the strap around your dog’s neck. Remember—this should not be choking tight. You want one to two finger room here, just like with other harness types.
Step 5: Double-Check Everything
Walk your fingers around the whole harness. Test the front clip where the leash attaches. Give it a gentle tug. The clip should be secure and not come loose.
Step 6: Take a Test Walk
Do a short walk around your house or yard before you head outside. Your dog might feel weird in the harness at first, especially if it’s new. Let them get used to it. Offer treats and praise to make it a positive experience.
Common Mistakes People Make
Even with good intentions, many people mess up harness fitting.
Mistake 1: Putting It On Too Loose
The most common error is leaving the harness too loose. Owners worry about hurting their dog or limiting their movement, so they loosen things up too much. A loose harness defeats the whole purpose. Your dog can slip out, get tangled, or choke if they lunge.
Mistake 2: Cinching It Way Too Tight
The opposite problem happens too. Some owners think tighter means more secure. They crank down on the straps until the harness is practically cutting off circulation. This makes your dog uncomfortable, restricts their breathing, and can actually cause them to resist wearing the harness.
Mistake 3: Uneven Fastening
If you don’t tighten both sides equally, the harness twists and sits crooked. This throws off the fit and makes your dog uncomfortable. Always check that both sides are snug and level.
Mistake 4: Ignoring the Fit Check
Harnesses shift during use. What feels right at home might loosen up during an active walk. Many owners never go back and check whether the harness still fits after their dog has worn it for a while.
Mistake 5: Skipping the Measurement Step
Buying a harness that’s labeled as your dog’s size without actually measuring first leads to problems. Sizing varies between brands. What’s medium in one brand might be large in another. Your measurements don’t lie—trust them over labels.
Mistake 6: Using the Wrong Harness Type
A back-clip harness won’t give you control if you have a power-puller. A front-clip might be overkill for a small, well-behaved dog. Match your harness type to your dog’s size and behavior.
Training Your Dog to Wear a Harness
Some dogs take to harnesses immediately. Others need time and patience.
Start with short wearing sessions at home. Put the harness on for just a few minutes while you’re playing with your dog or giving them treats. Let them move around and get comfortable. Gradually extend the time.
Once your dog seems okay with wearing it at home, take a short walk around the block. Don’t expect perfect behavior right away. Your dog is adjusting to new equipment.
Use treats and praise as rewards. Every time you bring out the harness, your dog should think something good is about to happen. This builds positive associations. Avoid chasing your dog around with the harness or forcing them into it. That creates bad memories and makes them resistant.
Some dogs scratch at the harness at first or try to escape it. Stay calm and don’t make a big deal out of it. Let them explore and adjust. Most dogs settle down after a few walks.
If your dog is really struggling, break the process into even smaller steps. Let them sniff and lick the harness before you try to put it on. Have them wear it indoors for a day or two before outdoor walks.
Pro Tips for Harness Success
Keep It Accessible
Store your harness somewhere your dog can see it. Some owners hang it by the door. Others keep it on a shelf your pup can spot. Familiarity breeds comfort.
Inspect Regularly
Check your harness weekly for damage, worn straps, or broken buckles. A damaged harness won’t work properly and could fail when you need it most.
Have a Backup
Keep another harness on hand. That way, if one gets dirty or needs repair, you still have a working harness for your daily walks.
Introduce It Slowly
Don’t expect your dog to love the harness immediately. Give them time. Some dogs warm up in days, others take weeks. That’s perfectly normal.
Make It Positive
Always associate the harness with good things. Put it on, then go to the park. Put it on, then play with their favorite toy. Put it on, then give them treats. Your dog will start getting excited when they see it.
Adjust as Your Dog Grows
Puppies grow fast. What fits perfectly today might be too tight in a few weeks. Check the fit every few days for young dogs.
Caring for Your Harness
A harness that’s well-maintained lasts longer and works better.
Most harnesses can be hand washed. Use warm water and mild soap. Scrub gently and rinse thoroughly. Air dry completely before using it again. Never throw a harness in the dryer or leave it in direct sunlight for extended periods—this can damage the material and weaken the straps.
Check the buckles and clips regularly. Make sure they’re not bent or broken. If you see damage, replace the harness. A faulty buckle could fail during a walk.
Store your harness in a cool, dry place. Don’t leave it bunched up wet or shoved in a hot car. This can damage the material and cause mold or mildew.
What to Avoid
Some things will just make the process harder.
Don’t punish your dog for resisting the harness. This makes them scared of it and less likely to cooperate next time.
Don’t use a harness as a punishment tool. Never say “You’re getting the harness because you were bad.” Your dog needs to view it as a neutral piece of equipment or, better yet, something positive.
Don’t assume the fit is perfect just because the harness is on. Check it every single walk for the first few weeks.
Don’t buy the cheapest harness you can find. Low-quality harnesses break easily and don’t fit properly. Invest in something that will last and keep your dog safe.
Don’t ignore signs that the harness is causing problems. If your dog has red marks, hair loss, or seems to be in pain, stop using it and try a different style or size.
Troubleshooting Common Problems
My Dog Keeps Trying to Escape the Harness
This usually means it doesn’t fit right. Check the fit. Loosen it slightly. Your dog might be sensitive to pressure, so give them time to adjust. Use lots of treats and positive reinforcement.
The Harness Keeps Slipping
A harness that slips is too loose. Tighten all the straps evenly. Make sure both sides are equally snug. If tightening doesn’t help, you might need a smaller size.
My Dog Can’t Seem to Sit or Lie Down
The harness is probably too tight or positioned wrong. Loosen the straps. Make sure the harness isn’t bunching up or twisting. Your dog should move freely.
The Front Clip Keeps Pointing Backward
This usually happens with vest-style harnesses. Make sure you’re fastening all the straps evenly. The front clip should naturally point forward when the harness is on correctly.
My Dog Seems Uncomfortable When Walking
Stop and check the fit. Sometimes a harness shifts during activity. Adjust the straps and buckles. Take a short walk to see if that fixes it. If the problem continues, the harness might not be the right style for your dog.
Final Thoughts
Learning to put on a dog harness correctly is one of those skills that seems small but makes a huge difference. A well-fitted harness keeps your dog safe, gives you control during walks, and makes the whole experience better for both of you.
The steps are simple: measure your dog, get the right size, learn the specific way your harness goes on, check the fit, and practice. Most dogs adjust quickly, and you’ll be a harness pro after just a few walks.
Start with patience. Give your dog time to adjust to wearing the harness. Use treats and praise to build positive associations. Soon, your pup will be ready for every adventure—a walk around the block, a trip to the dog park, or a weekend hiking adventure.
A properly fitted dog harness is an investment in your dog’s comfort and safety. Take the time to get it right, and you’ll have years of happy, secure walks together.