How to Install a Cat Door?
If you’re a cat owner, you know how much your furry friend loves their freedom. A cat door is one of the best ways to give them the independence they crave without you having to stand at the door all day. But if you’ve never installed a pet door before, it can seem intimidating.
Good news: installing a cat door is totally doable. You don’t need to be a DIY expert or hire an expensive contractor. In this guide, I’ll walk you through everything you need to know. By the end, you’ll have your cat strutting through their new entrance like they own the place.
Why Your Cat Needs a Pet Door
Let’s start with the basics. Why even install a cat door in the first place?
Your cat gets fresh air and sunlight without you being their personal doorman. They can come and go as they please. This is huge for their mental health and physical fitness. Plus, you get some peace and quiet knowing they can take care of their bathroom needs outside.
A pet door also protects your actual doors. No more scratching at the entry when they want out. No more midnight yowling from a cat stuck on one side of a closed door. A cat door installation solves these problems once and for all.
Indoor cats especially benefit from having access to an outdoor space. If you’re only letting your cat outside during supervised time, a door cat installation gives them more independence. Outdoor cats get an easy way back inside during bad weather or when they need rest.
The best part? You’re not stuck answering every single meow. Your life becomes easier, and your cat becomes happier. That’s a win-win.
Types of Cat Doors Available
Not all cat doors are the same. Before you start any installation, pick the right type for your situation.
Standard Plastic Cat Doors
These are the classic pet doors. Simple, cheap, and effective. They’re usually made of hard plastic with a flexible rubber flap. Your cat pushes through, and the flap closes behind them. No moving parts, no batteries needed.
Standard doors work great for most cats. They’re lightweight and easy to install. The downside? They let in bugs, drafts, and sometimes other animals. If you live in a cold climate, these aren’t your best choice.
Magnetic Cat Doors
Magnetic doors add a security layer. Your cat wears a special collar with a magnet. When they approach, the magnet triggers the flap to unlock. Other animals can’t get in.
This type costs more than basic doors. The collar can be uncomfortable for some cats. But if you have raccoons, stray cats, or other critters trying to sneak inside, magnetic doors are worth the investment.
Microchip Cat Doors
These are the high-tech option. Your cat gets a microchip (the same one vets use to identify lost pets). The door scans for the chip and opens only for your cat.
Microchip pet doors are expensive. But they’re perfect if you have multiple cats and want to control which one goes outside. They also block other animals without your cat wearing anything uncomfortable.
Electric Cat Doors
Electric doors use batteries or a power cord. They can lock automatically at certain times. Some let you control access from your phone.
These are the most expensive option. They’re great if you want to limit your cat’s outdoor time or prevent nighttime wandering. For basic installations, though, they’re overkill.
Where Should You Install Your Cat Door?
Location matters more than most people think.
Door Installation Options
You have two main choices: door installation or wall installation.
Installing in an exterior door is usually easiest. You’re cutting through wood or aluminum, not brick or concrete. The door opening is already there. You just need to cut a small pet door opening and insert the frame.
Wall installation is trickier. You need to cut through drywall, insulation, and possibly siding. But walls give you more flexibility. You can place the door exactly where you want it. A cat door in a wall sometimes looks better than one in a door, too.
Best Door Locations
If you’re doing a door installation, pick an exterior door your cat uses most often. The back door is usually ideal. Front doors work too, but many people don’t want their cat coming and going at the front of the house.
Make sure the door stays unlocked so your cat can get back inside. A door installation that’s locked defeats the purpose entirely.
Avoid installing near places your cat might hide or get stuck. Don’t put a pet door installation right next to a bush where a predator could wait. Distance from dangers is important.
Height Considerations
Your cat doesn’t need a lot of height to pass through. Position the door so the bottom edge is 4 to 6 inches off the ground. This lets smaller cats get through without crouching too much. Older cats with joint pain especially appreciate a door that’s not too low.
If you have multiple cats of different sizes, aim for a height that works for your smallest cat. Larger cats can still get through fine.
Tools and Materials You’ll Need
Gather these items before you start. Having everything ready means you won’t have to stop halfway through.
Basic Tools
- Drill with bits
- Saw (circular saw or handsaw)
- Measuring tape
- Level
- Pencil or marker
- Screwdriver set
- Utility knife
- Sandpaper or file
Materials
- Your chosen cat door kit
- Wood screws (usually included)
- Weatherproof sealant or caulk
- Hinges for a wall installation (if needed)
- Wood trim or molding (optional, for finishing)
Most cat door kits come with everything you need except the cutting tools. Check your kit before shopping.
Measuring and Marking Your Opening
This is the most critical step. Measure twice, cut once. This isn’t just a cliché.
How to Measure
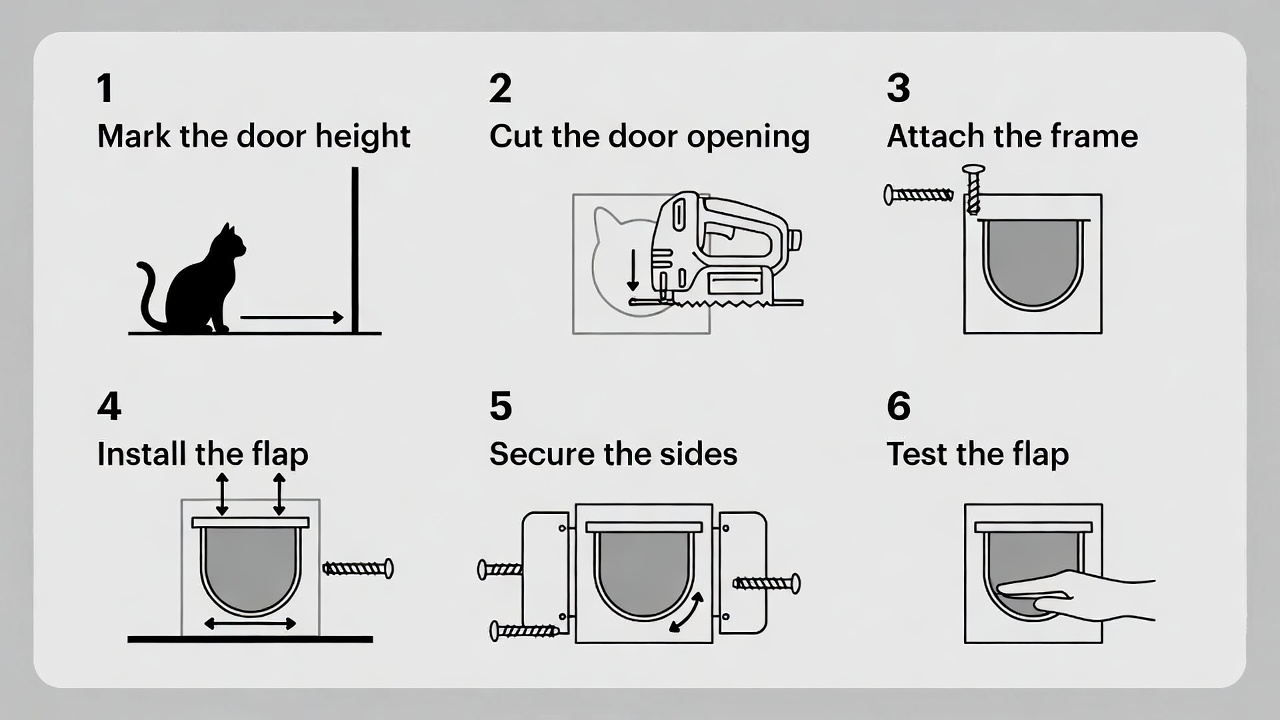
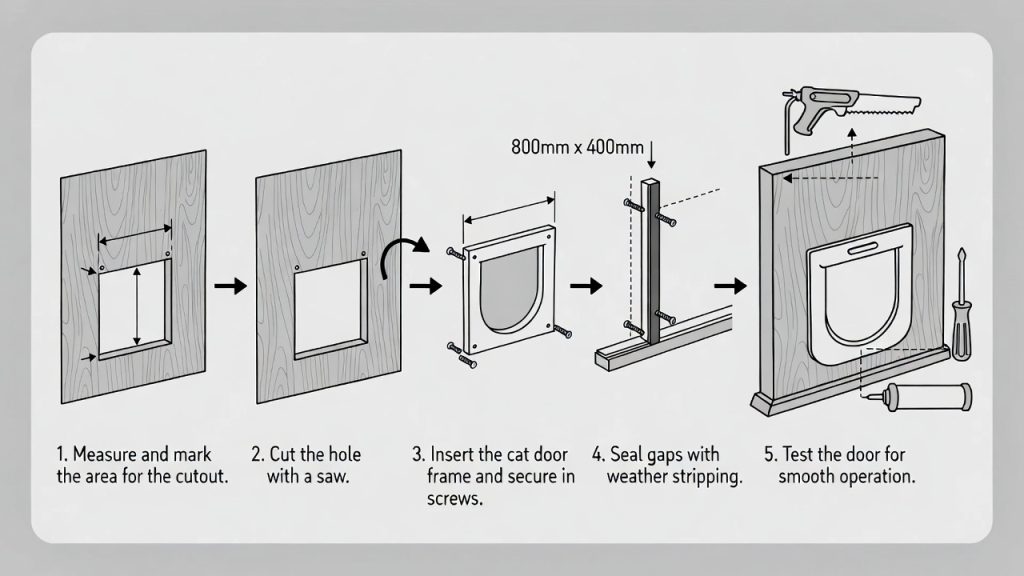
Lay the cat door frame on your door. Center it where you want the opening. Mark the corners with a pencil. Double-check that the door is level using your level tool. You don’t want a crooked cat door opening.
Most cat door kits include a template. Use it. Templates prevent mistakes. Tape the template to your door and mark through the holes. This takes two minutes and saves you from cutting a door that’s off by an inch.
Measure the height from the bottom edge of the door to where your cat door opening will start. Write this down. Measure from the side edges too. Write everything down. Not trusting your memory here is smart.
Marking the Cutting Line
Once you have your location, use the template to draw the exact cutting line. A pencil works, but a marker shows up better. Press hard enough to see clearly.
Look at your marks from different angles. Does the opening look centered? Is it straight? Now’s the time to erase and redo if something looks wrong. Once you pick up the saw, you can’t undo it.
Cutting the Opening for Your Cat Door
Here comes the scary part. But it’s not as hard as you think.
Cutting Through Doors
If you’re doing a door installation with a wood door, start with a drill. Drill a hole in each corner of your marked opening. Use a bit slightly smaller than your saw blade width. These holes let your saw blade turn around easier.
Insert your saw blade into one of the holes. Cut along your marked line slowly. Don’t rush. Use even pressure. Your arms might get tired, but that’s okay. Take a break if you need to.
A circular saw is faster than a handsaw. But a handsaw gives you more control. Pick what you’re comfortable with.
If you’re cutting through a metal door, use a different approach. Metal-cutting blades exist for both saws and drills. A rotary tool with a metal-cutting wheel works too. Go slow with metal. It can catch and twist suddenly.
Cutting Through Walls
Wall cutting is messier but works the same way. Use the template as a guide. Drill starter holes in each corner.
You’ll cut through drywall, then insulation, then possibly the outside siding. Cut through the drywall first. Then clear out the insulation. Finally, cut through the outer material.
Use a drywall saw for the inside work. Switch to a circular saw if you need to cut through siding or concrete. Each material needs a different blade and approach.
Finishing the Cut
After cutting, use sandpaper or a file to smooth the edges. Rough edges can catch on the door frame. They look unfinished too. Spend five minutes smoothing everything down.
If you cut through drywall, some will crumble and look messy. That’s fine. You’ll cover most of it with the door frame anyway.
Installing the Cat Door Frame
Now for the fun part. Your opening is ready. Time to insert the door.
Positioning the Frame
Insert the frame into your opening. It should fit snugly. Don’t force it. The frame shouldn’t slide around inside the opening.
If it’s loose, you might have cut the opening too large. Add shims (thin wooden wedges) to tighten the fit. Shims go between the frame and the door opening.
From inside your house, look at the frame. Is it level? Is it centered? Adjust until it looks right. Use your level to confirm.
Securing the Frame
Most frames come with screw holes pre-drilled. Drill pilot holes in your door or frame to match. Pilot holes are smaller than the screw. They prevent splitting.
Use the screws provided in your kit. Usually, these are wood screws about 2 inches long. Screw the frame into place. One screw in each corner is standard. Some frames need more. Check your instructions.
Don’t over-tighten. You want the frame secure, not stripped. Tight enough to hold, but not so tight you crush the plastic.
Installing the Flap
The flexible flap usually sits inside a groove in the frame. Simply slide it in from the top. It should move freely. Test it with your hand. Push it both directions. It should swing easily and close on its own.
Some doors have internal hinges for the flap. These already come assembled. You just install the whole unit.
For magnetic doors, the magnet collar goes on your cat. Attach it to their collar. The door might need adjustment once your cat tries it. Most magnetic doors have adjustment screws. You can tweak the magnet sensitivity.
Sealing and Weatherproofing Your Installation
A cat door is a hole in your home. You need to seal it properly to keep out weather, bugs, and cold air.
Applying Caulk
Caulk seals gaps around the frame. Use weatherproof caulk. Run a bead of caulk around the entire frame where it meets the door or wall.
Use a caulk gun. Hold the gun at a 45-degree angle. Squeeze steadily as you move along the frame. One smooth line is better than a bunch of small squirts.
Smooth the caulk with your finger or a caulk tool. This presses it into gaps and makes it look clean.
Let caulk dry fully before your cat uses the door. Some caulks dry in 30 minutes. Others take 24 hours. Check the package.
Adding Weather Stripping
Weather stripping goes on the flap edges. It reduces drafts and keeps bugs out.
Peel-and-stick weather stripping is easiest. Just clean the area, peel the backing, and press it on. Adhesive-backed stripping needs a clean, dry surface to stick.
Only add stripping if your door doesn’t already have it. Some newer doors come with stripping pre-installed.
Insulating for Cold Climates
If you live somewhere cold, you might want extra insulation. Some cat doors come with insulated flaps. These have foam inside the plastic.
You can also install a draft cover over the opening when it’s very cold. These are like little tunnels that prevent direct wind access. Just make sure your cat can still get through easily.
For very cold climates, a wall installation with proper sealing is better than a door installation. Walls are easier to insulate properly.
Training Your Cat to Use Their New Door
You’ve installed the door. Now comes the big question: will your cat actually use it?
The Introduction Phase
Don’t expect your cat to charge through immediately. Some cats are brave. Others are cautious.
Prop the door open at first. This removes the barrier and lets them see through. Let your cat explore at their own pace. Don’t push them. Forced introduction creates fear.
Sit nearby with treats and toys. Make the area around the door positive. Praise and reward your cat when they approach or move toward the door.
Pushing Through the Flap
Once your cat is comfortable with the opening, let the flap close. They need to learn to push through.
Gently push the flap to show them it moves. Some owners use a small stick or your finger to move the flap while your cat watches.
Push your cat’s head slightly toward the flap. Don’t shove them. A light nudge is all you need. They’ll get the idea.
Reward progress immediately. Treats work wonders. A small piece of their favorite food creates powerful motivation.
Encouraging Outdoor Time
Once your cat can push through, encourage them to go outside. Call to them from beyond the door with treats.
It might take days or weeks for your cat to feel confident. That’s normal. Patience pays off.
Some cats figure out the door in minutes. Others take weeks. Indoor cats who’ve never been outside take the longest. They’re adjusting to multiple new things at once.
Establishing Routine
Once your cat is using the door, set boundaries. Many owners only allow outdoor access during certain hours. This prevents dangerous nighttime wandering.
Train your cat to come inside on command. Use a whistle, a bell, or a specific call. Reward them when they respond. Make coming inside as appealing as going out.
Maintaining Your Cat Door
A cat door lasts longer with basic care.
Regular Cleaning
Clean the flap regularly. Dirt, dust, and debris accumulate. Use a damp cloth to wipe both sides. A little mild soap works too.
Check the frame for dirt buildup. Clean it monthly or more often if your cat tracks a lot of mud.
Checking the Fit
Over time, doors can sag or warp. Check that the flap still moves freely. It shouldn’t stick or drag.
If the flap starts sticking, clean the tracks. Lubricate any hinges with a small amount of light oil. Never use heavy grease. It attracts dirt.
Weather Monitoring
Before harsh weather, inspect your sealing. Look for gaps in caulk. Re-caulk if needed.
Check weather stripping. If it’s worn or peeling, replace it. New weather stripping is cheap and takes five minutes to install.
Addressing Issues
If your cat stops using the door, something’s wrong. Maybe the flap is stuck. Maybe a scary experience happened near the door.
Reset the training process. Prop the door open again. Let your cat get comfortable. Investigate what scared them if possible.
Troubleshooting Common Problems
Even experienced installers run into issues. Here’s how to fix them.
The Door Is Drafty
Drafts mean gaps in your sealing. Check the caulk around the frame. Look for cracks or missing caulk.
If caulk is missing, re-caulk the area. If weather stripping is worn, replace it.
For serious drafts, add a draft cover or flap extender. These devices add a tunnel around the door. They look funny but work great.
Your Cat Won’t Use the Door
Patience is the main solution. Some cats take weeks.
Also check that the door actually works. Test the flap with your hand. Is it easy to move? Is it stuck? Fix any mechanical problems first.
Make sure your cat has a reason to go outside. Bored indoor cats might not care. Try playing with them outside or placing toys in the yard.
Other Animals Are Getting Inside
A basic door won’t keep determined raccoons out. Upgrade to a magnetic door or microchip model. These stop most intruders.
You can also use a locking cat door that closes at night. A timer-controlled lock prevents nocturnal visits from unwanted guests.
The Installation Leaks
Water leaking around the door frame means poor sealing. Check all your caulk. Look for gaps.
Re-caulk problem areas. Make sure weather stripping is intact. For severe leaks, a professional’s help might be needed.
Safety Considerations for Your Cat
An open door to the outdoors introduces new risks. Be aware and prepare.
Predators and Dangers
Your cat is now exposed to cars, larger animals, and harsh weather. Make sure your yard is relatively safe.
Keep your cat vaccinated. Outdoor exposure to disease is more likely. Annual vet visits are crucial.
Consider keeping your cat indoors at night. Nighttime is when most predators hunt. A curfew keeps your cat safer.
Microchipping
Even if you don’t install a microchip door, get your cat microchipped. If they escape or get lost, microchips reunite you.
It’s a quick, inexpensive procedure your vet can do.
Collar and ID Tags
Your cat should always wear a collar with ID tags. The tag should have your phone number. Many cats are found because of simple ID tags.
Update the tag information if you move or change phone numbers.
Seasonal Considerations
Different seasons bring different challenges for cat door owners.
Winter Installation
Cold climate installations need extra thought. Standard cat doors let cold air in. Consider upgrading to insulated models.
Some owners install doors only seasonally. They close off the cat door opening in winter and open it again in spring.
Install a draft cover for the coldest months. Your cat might not like it at first, but they adapt.
Summer Concerns
Summer brings heat and bugs. Standard cat doors let flies and insects inside. Some people add bug screens over the door. These work like window screens.
Make sure your cat has access to water. Heat is serious for cats. Outdoor access is great, but shade and water are essential.
Keep your cat cool by providing shaded areas. A cat door without outdoor shelter isn’t ideal in extreme heat.
Professional Installation vs. DIY
Can you do this yourself? Probably.
If you’re handy and comfortable using tools, DIY installation saves money and gives you a sense of accomplishment. The steps in this guide work.
If you’re not handy, or if you live in an apartment, hiring a professional makes sense. Landlords sometimes have specific rules about door modifications.
Professionals finish faster and cleaner. They can handle tricky installations like brick walls. A professional finish often looks better.
Cost varies. Basic door installations run 50 to 200 dollars if you hire someone. The door itself costs 15 to 150 dollars depending on type.
Final Thoughts
Installing a cat door is achievable for most people. Take your time. Measure carefully. Choose the right door for your situation. Your cat will reward you with freedom and independence.
The first time you see your cat waltz through their new door? That feeling of accomplishment is worth every minute you spent. Your cat gets the freedom they’ve always wanted. You get a break from being a furry doorman.
Follow this guide, stay patient during training, and you’ll have a happy, outdoor-access cat in no time. Welcome to the club of enlightened cat owners who actually let their cats out.