How to Assemble a Dog Stroller?
So you just got a dog stroller. It’s sitting in a big box. You’re not sure where to start. Don’t worry — you’re in the right place.
Assembling a pet stroller sounds tricky, but it really isn’t. Most dog strollers go together in under 30 minutes. Some take even less time. This guide walks you through everything, from unboxing to first use.
Let’s get into it.
Why a Dog Stroller Is Worth the Effort
Before we jump into the steps, let’s talk quickly about why this little investment pays off.
Dog strollers are great for older dogs with joint pain. They help small breeds go on longer walks. They’re also perfect for dogs recovering from surgery or injury. Even anxious dogs love the feeling of being enclosed and safe during busy outings.
A pet stroller lets your dog enjoy the outdoors without overexerting themselves. It keeps your pup comfortable and gives you peace of mind. Once you get it built, you’ll both love it.
Now let’s build it.
What You’ll Need Before You Start
You don’t need a lot. Here’s what to gather before you open the box:
- A flat, open space to work (a living room floor works great)
- The instruction manual that came with the stroller
- A Phillips-head screwdriver (just in case)
- Any tools mentioned in your specific model’s manual
Most dog strollers are designed to be assembled without tools. But it’s smart to have a screwdriver nearby just in case a bolt feels stubborn.
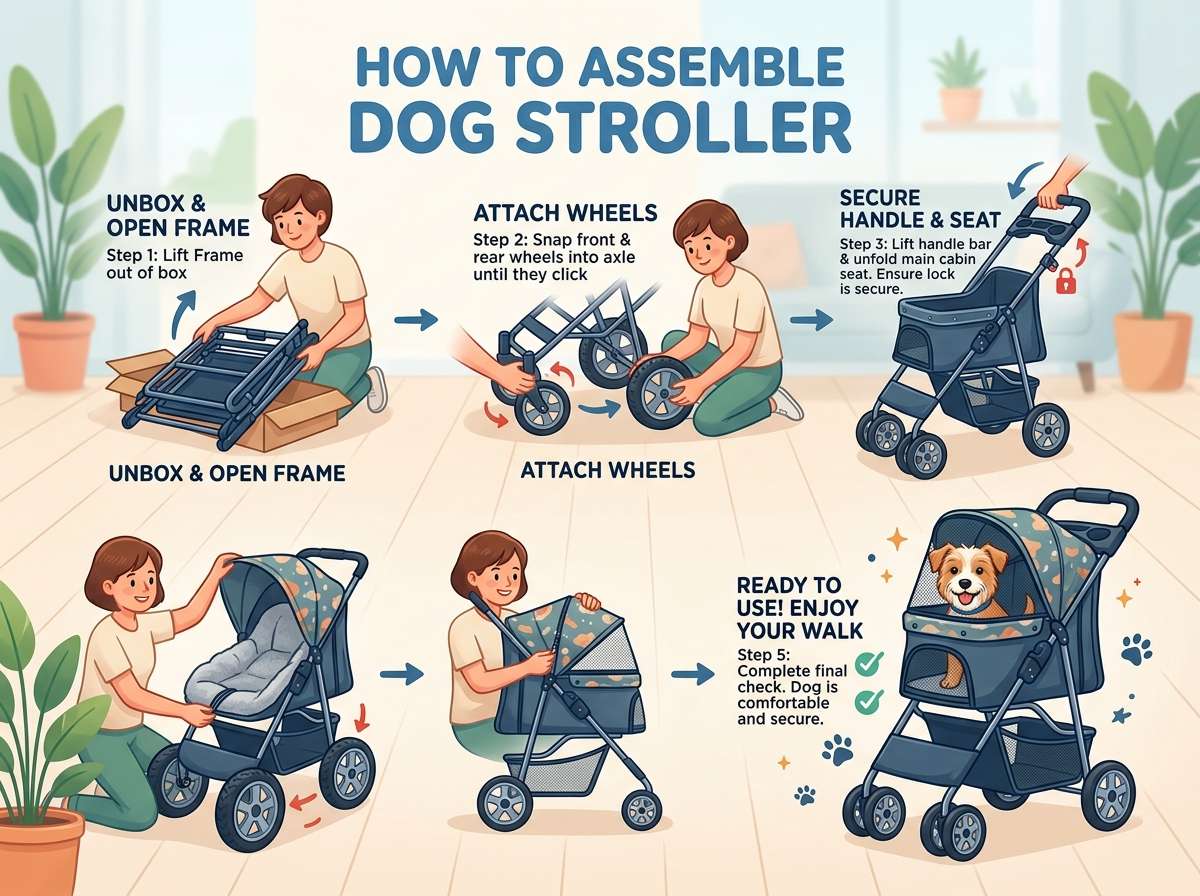
Step 1: Unbox Everything Carefully
Open the box slowly. Don’t rush this part.
Pull everything out and lay the pieces on the floor. Take your time. Some parts are wrapped in plastic or foam. Remove all the packaging before you start.
Once everything is out, do a quick count. Check the parts list in your manual. Make sure nothing is missing. Common parts include:
- The main frame or chassis
- The front wheels
- The rear wheels
- The handlebar (sometimes called the push bar)
- The canopy or sun cover
- The storage basket
- The safety tether or leash clip
- Bolts, screws, or locking pins (some models)
- Foot brake or parking brake
If something is missing, contact the seller before moving on. It’s easier to deal with that before you’re halfway through assembly.
Step 2: Lay Out the Frame
Most dog strollers have a foldable frame. It usually comes folded flat for shipping.
Hold the frame upright. Look for the main locking latch or release button. On most models, it’s near the center of the frame. Press or pull it to start unfolding the stroller.
Gently push the frame open. You should hear or feel a click when it locks into place. That click is important — it means the frame is locked open and stable.
If the frame doesn’t click, double-check the locking mechanism. Sometimes a small lever or pin needs to snap into a slot. Your manual will show you exactly where to look.
Don’t force anything. Dog stroller frames are usually lightweight aluminum or steel. They’re strong, but they can bend if you push too hard.
Step 3: Attach the Front Wheel or Wheels
Front wheel setup varies by model. Some dog strollers have one front swivel wheel. Others have two side-by-side front wheels.
Look at the front fork of the frame. You’ll see an axle or a fork socket where the wheel attaches.
For a single swivel wheel: Slide the wheel post into the front fork socket. Push it in firmly until it clicks or locks. Some models use a quick-release pin. Push the pin through the hole to secure it.
For double front wheels: Line up each wheel with its axle on the front fork. Slide them on. Lock them with the cotter pins or locking rings included in the hardware bag.
Give the front wheel a spin. It should move freely. If it drags or wobbles, check that it’s fully seated. A wobbly wheel usually means it’s not clicked in all the way.
On strollers with swivel front wheels, you may also see a small lock button near the fork. This lets you lock the front wheel straight for walking in a straight line. Unlock it when you need to turn or maneuver.
Step 4: Attach the Rear Wheels
Rear wheels on most dog strollers attach the same way as the front, just bigger.
Look at the rear axle on both sides of the frame. The wheels should slide onto the axle posts. Push each one on firmly.
Most rear wheels use a quick-release button or lever. Press the button and slide the wheel on. Release the button to lock it. Give each wheel a tug to make sure it won’t slide off.
Some heavier-duty pet strollers use bolt-on rear wheels. If yours does, use the included wrench or your screwdriver to tighten the bolts. Don’t overtighten — snug is enough.
Spin each rear wheel. They should roll smoothly and quietly. If they make a grinding sound, check for any protective foam or plastic wrap still on the axle.
Step 5: Set Up the Handlebar
The handlebar is what you push. On many dog strollers, it comes pre-attached or partially attached to the frame.
If yours needs to be attached, slide the handlebar into the frame’s upper tube sockets. Line up the holes on the handlebar post with the holes on the frame. Insert the locking pin through both holes. Snap the safety clip (usually a small ring or pin) into place to keep it locked.
Some handlebars are height adjustable. If yours is, look for a height adjustment button or lever along the post. Press it and slide the handle to a comfortable height. Release the button. The handle should lock at that height.
A good handlebar height lets you push the stroller with your arms slightly bent. You shouldn’t have to hunch down or reach up awkwardly.
Step 6: Install the Canopy
The canopy is the fabric hood that shades your dog from sun, wind, and light rain.
Most canopies attach using velcro straps, snap buttons, or metal rod pockets. Here’s the most common method:
Look at the canopy. You’ll see a set of fabric sleeves or rod pockets at the top edge. The metal canopy rods come pre-attached to the frame. Slide each rod into its pocket on the canopy.
Once all rods are inside the fabric pockets, snap or velcro the canopy to the frame sides. Pull the fabric taut so it sits evenly.
Test the canopy by extending it over the stroller cab. It should cover the opening fully when extended. When folded back, it should lay flat against the stroller top.
Some canopies also have a mesh peek-a-boo window. This is a zippered screen that lets you see your dog during walks. Make sure the zipper moves smoothly before you head out.
Step 7: Attach the Storage Basket
Most dog strollers come with a storage basket that hangs under the stroller cab between the rear wheels.
This basket usually clicks or snaps onto metal hooks on the lower frame rails. Hold the basket up beneath the stroller. Line up the basket’s corner loops or hooks with the frame hooks. Snap each one into place.
Give the basket a gentle tug to make sure it’s secure. It should hold without drooping or swinging.
This basket is great for carrying dog treats, water bottles, poop bags, and small gear. Just don’t overload it — most pet stroller baskets hold up to about 10 to 15 pounds.
Step 8: Check the Brake System
Every dog stroller has a brake. This is a safety feature that keeps the stroller from rolling when you stop.
Most brakes are foot-activated. You’ll see a small lever near one or both rear wheels. Press it down with your foot to engage the brake. Press the release tab to disengage it.
Test the brake on a flat surface. Engage it. Then try to push the stroller. It should stay locked in place. If it rolls, the brake may need adjustment. Check the manual for how to adjust the brake tension.
Some strollers also have a wrist safety strap on the handlebar. Loop this around your wrist during walks. If the stroller ever rolls away, the strap helps you catch it.
Step 9: Set Up the Interior of the Cab
The inside of the stroller cab is where your dog will sit or lie down.
Most strollers come with a removable interior liner or pad. This is usually a soft fabric pad with velcro edges. Press it into the bottom of the cab. It adds cushioning and is usually machine washable.
Some strollers also include a safety tether inside the cab. This is a short leash clip that attaches to your dog’s harness. It keeps your pup from jumping out if the canopy is open.
Clip the safety tether to the anchor point inside the cab. Then clip the other end to your dog’s harness — never to a collar. This prevents neck strain if they lunge or jump.
Step 10: Do a Full Safety Check
Before you put your dog inside, do a final check.
Go through this list:
- Frame: Fully open and locked in place
- Front wheel: Secure, spinning freely
- Rear wheels: Secure, no wobble, spinning freely
- Handlebar: Locked at a comfortable height
- Canopy: Attached on all sides, extends and retracts smoothly
- Basket: Attached and not sagging
- Brake: Engages and releases properly
- Interior pad: In place and flat
- Safety tether: Attached inside the cab
- Zippers: All zipper pulls move smoothly
Give the whole stroller a gentle shake. Nothing should rattle loose. Push it a few feet and test a turn. It should roll easily and steer without effort.
Introducing Your Dog to the Stroller
You built it. Now comes the fun part.
Don’t just drop your dog inside and start walking. Most dogs need a little time to adjust to a new piece of equipment.
Start by letting your dog sniff the stroller. Let them walk around it. Put a treat inside the cab without closing anything. Let them climb in on their own. Praise them a lot.
Do this a few times inside the house. Once your dog is comfortable going in and out, zip up the canopy halfway. Then try a short walk around the yard or driveway.
Slowly extend the duration of each walk over a few days. Most dogs get comfortable with their pet stroller quickly, especially when they associate it with treats and outdoor smells.
Common Assembly Mistakes to Avoid
Even simple assemblies have a few spots where people go wrong. Watch out for these:
Skipping the parts check. Always count your parts before starting. A missing piece is much easier to deal with before assembly than halfway through.
Not locking the frame fully. The frame needs to click into the open position. If it’s not fully locked, it can fold while your dog is inside.
Forgetting the safety clip on wheels. Quick-release wheels have small safety clips that prevent accidental removal. Always install these.
Overloading the basket. The undercarriage basket has a weight limit. Exceeding it can damage the frame or cause the stroller to tip.
Skipping the safety tether. It seems like a minor accessory, but it keeps your dog safe if they try to jump out during a walk.
Tips for Long-Term Maintenance
A well-maintained dog stroller lasts for years. Here are some simple care habits:
Clean the wheels regularly. Dirt and hair can clog wheel bearings. Wipe them down after muddy walks.
Wash the interior pad. Most pads are machine washable. Keep it fresh and your dog will stay comfortable.
Check the frame bolts every few weeks. Vibration from rolling can loosen bolts over time. A quick tighten keeps everything solid.
Lubricate the wheel axles. A small amount of silicone spray or WD-40 keeps the wheels rolling smoothly. Do this every couple of months.
Store it dry. If you get caught in rain, let the stroller dry fully before folding and storing. Moisture inside a folded stroller can cause mildew or rust.
Inspect the canopy fabric. Check for small tears or loose stitching. Small tears can be repaired with fabric glue. Fixing them early prevents bigger rips later.
Dog Stroller FAQs
How long does assembly take? Most dog strollers take 15 to 30 minutes to fully assemble. Once you’ve done it once, you can do it again in half the time.
Do I need any tools? Most models are tool-free. A Phillips screwdriver is useful to have nearby just in case.
Can I use a dog stroller on rough terrain? It depends on the model. Lightweight strollers are best for smooth pavement. Jogging or all-terrain dog strollers have larger wheels and better suspension for gravel paths and grass.
What weight limit do dog strollers have? Most standard pet strollers hold between 20 and 50 pounds. Always check your specific model’s weight limit before use.
Is a dog stroller safe for puppies? Yes, with the safety tether attached. Puppies can be wiggly and curious. The tether keeps them safely inside the cab.
Final Thoughts
Assembling a dog stroller really isn’t as hard as it looks. Take it one step at a time. Follow the sequence. Do your safety check at the end.
Once it’s built and your dog climbs in for the first ride, you’ll be glad you took the time. There’s something really sweet about watching your pup enjoy the outdoors from the comfort of their own little carriage.
Now go take that first walk. You both earned it.
Hi, I’m Mary, the founder of PetGadgetPro.com. I’m a passionate pet lover with a special place in my heart for dogs and cats. I share practical advice and honest insights on pet gear to help pet parents make better choices. My dedicated research team studies products in depth, and our writers create reviews using trusted, authentic sources—so you can feel confident choosing the best for your pets.