How to Groom a Dog at Home?
If you own a dog, you know that keeping your furry friend clean and well-groomed is a big part of pet care. Many dog owners take their pups to professional groomers, but the truth is that you can do basic dog grooming right at home. Not only does this save you money, but it also gives you more time to bond with your pet. In this guide, we’ll walk you through everything you need to know about grooming your dog at home.
Why Home Grooming Matters for Your Dog’s Health
Before we dive into the how, let’s talk about why dog grooming is so important. Grooming isn’t just about making your dog look good. A proper grooming routine keeps your pet healthy and comfortable. When you groom your dog regularly, you check their skin, ears, and teeth. You catch problems early, like matted fur, infections, or parasites. Regular dog care and maintenance at home also helps your dog feel relaxed and happy.
Dogs that get groomed often become more comfortable with the process. This means fewer stress moments during bath time or nail trims. Over time, your dog will trust you more and actually enjoy the grooming sessions with you.
Gather Your Dog Grooming Tools
You don’t need to spend a fortune on tools. Start with these basic dog grooming supplies that work for most dogs:
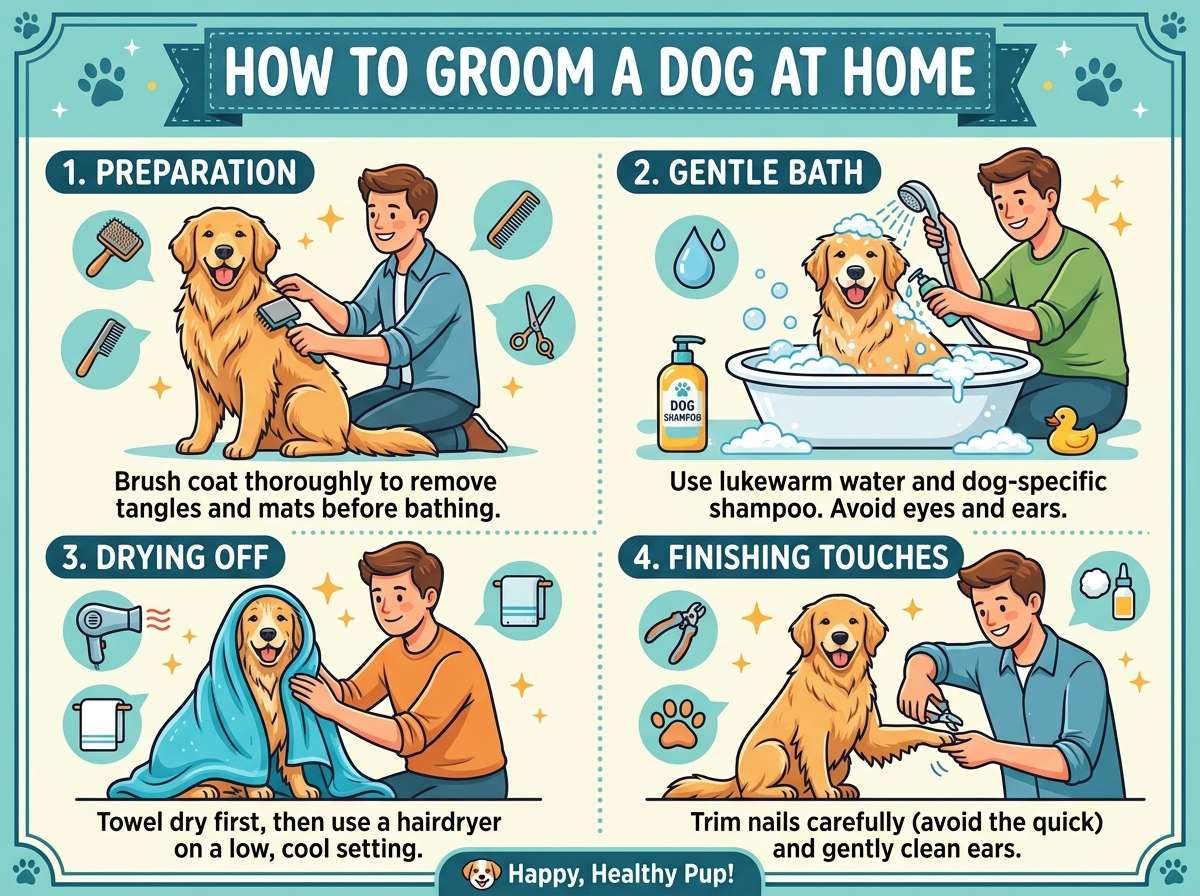
Brushes and Combs A slicker brush works great for removing tangles and mats from your dog’s coat. If your dog has long fur, you’ll want both a slicker brush and a metal comb. Short-haired dogs do well with a rubber curry brush or a bristle brush. These tools help remove loose hair and keep the coat healthy.
Nail Clippers Invest in a good pair of dog nail clippers. There are two main types: scissor clippers and guillotine clippers. Try both to see which one feels easier for you to use. Dull clippers hurt your dog’s nails, so keep them sharp.
Ear Cleaning Supplies Cotton balls and a dog ear cleaning solution are all you need. Never use Q-tips or stick anything deep into your dog’s ear. Just clean what you can see.
Dog Shampoo and Conditioner Always use dog shampoo, not human shampoo. Dog skin has a different pH level than human skin, so human products can irritate their skin. Pick a shampoo made for your dog’s skin type.
Towels and Mats Get some old towels you don’t mind getting wet and dirty. Non-slip mats help your dog feel secure during baths. Your dog will be less scared when they have solid ground under their paws.
Clippers for Fur Electric dog clippers let you trim longer coats or remove mats. If you have a long-haired breed, clippers are worth the investment. Start with a basic model if you’re new to this.
Dog Toothbrush and Toothpaste Dog toothpaste comes in flavors like chicken and beef that dogs actually like. A soft-bristled toothbrush or a finger brush works well.
Creating the Perfect Grooming Space
You don’t need a fancy setup. Find a space where your dog feels safe and you have room to work. Here’s what helps:
The Right Height Work at a table or counter where you don’t have to bend down too much. A grooming table is nice but not required. A sturdy elevated surface like your kitchen counter works fine. Make sure your dog can’t jump off and hurt themselves.
Good Lighting You need to see what you’re doing, especially when trimming nails or cleaning ears. Natural light from a window is great, but a lamp works too.
Non-Slip Surface Your dog will feel safer if their paws don’t slide around. Use a rubber mat or towel under them. When your dog feels stable, they stay calm.
Bathroom Setup for Bathing The bathroom is often the best place for bath time. A shower works better than a bathtub for most dogs. Put a rubber mat in the tub or shower so your dog doesn’t slip. Have all your supplies within arm’s reach before you start.
Step-by-Step Guide to Brushing Your Dog’s Coat
Brushing is the easiest grooming task to start with. It feels good to your dog and helps you bond.
Start Slow If your dog has never been brushed much, introduce the brush slowly. Let them sniff it. Brush gently on their legs and body. Keep the first session short, maybe five minutes.
Work Section by Section Divide your dog’s body into sections. Brush the neck, then the chest, then the sides, legs, and belly. Work from head to tail. Brush in the direction the fur grows naturally.
Handle Mats and Tangles If you find a mat, don’t pull hard. Work gently from the outside of the mat toward the inside. Use your fingers and the comb to loosen it. If a mat is too tight, you might need to cut it out carefully or use a mat splitter tool.
Pay Attention to Problem Areas Dogs get matted fur behind their ears, under their arms, and around their rear end. These areas need extra attention. Check these spots every few days.
The Undercoat Dogs with thick coats have an undercoat underneath the outer fur. Use an undercoat rake or slicker brush to remove this loose hair. This step keeps your dog cooler and reduces shedding all over your house.
Brush Duration Spend time brushing your dog based on their coat type. Long-haired dogs need brushing two or three times a week. Short-haired dogs can go a week between brushings. Dogs with double coats need more attention.
How to Bathe Your Dog at Home
Bath time is easier than you think once you get the hang of it.
Prepare Everything First Gather your shampoo, towels, and a cup for rinsing before you bring your dog to the bathroom. Wet paws on the floor can make things slippery. Have treats ready for rewards.
Use the Right Water Temperature Warm water feels good. Test it on your wrist to make sure it’s not too hot. Your dog’s skin is sensitive, so lukewarm water is perfect.
Wet the Coat Thoroughly Start by wetting your dog’s legs and body. Work toward the neck and head. Keep water out of their eyes and ears. If water gets in their ears, gently wipe it out with a cotton ball.
Apply Shampoo from Tail to Head Squeeze shampoo onto your hands and massage it into the wet fur. Start at the tail and work toward the head. Make sure you wash the belly, legs, and between the toes. Use a little shampoo around the face and ears without getting soap in the eyes.
Rinse Completely This step is super important. Any leftover shampoo makes the coat look dull and can irritate the skin. Rinse and rinse again. When you think you’re done rinsing, rinse one more time. The water should run clear.
Use Conditioner if Needed If your dog has dry skin or a long coat, apply conditioner after shampooing. Let it sit for a few minutes, then rinse it out completely.
Dry Your Dog Properly Squeeze water from the coat with your hands. Wrap your dog in towels and rub gently. If you use a blow dryer, keep it on a low heat setting and keep moving it so you don’t burn the skin. Some dogs hate the dryer noise, so towel drying works fine too.
Check the Ears After the bath, wipe the inside of the ears with a dry cotton ball to remove any water that got inside.
Trimming Your Dog’s Nails Without Fear
Many dog owners worry about nail trimming, but it’s totally doable once you learn where to cut.
Understand the Nail Structure Inside each nail is a pink part called the quick. This part has blood vessels and nerve endings. If you cut into the quick, it hurts and bleeds. On light-colored nails, you can see the quick as a pink circle. On dark nails, it’s harder to see. Only cut the clear or white part of the nail.
Measure Before Cutting Look at the nail from the side. You want to cut just the curved part that extends past where the nail would naturally touch the ground. Imagine a 45-degree angle from the nail pad.
Get a Good Grip Hold your dog’s paw gently but firmly. Spread the toes slightly to see the nails better. Have your clippers ready and positioned at the right spot.
Make a Quick Cut Position the clippers at the right angle and cut in one smooth motion. Don’t squeeze slowly. A fast cut is cleaner and less scary for your dog.
If You Cut Too Short Don’t panic. The nail will bleed a bit. Have styptic powder on hand to stop the bleeding. Dip the nail in the powder or apply it with a cotton ball. Press gently for a minute. Your dog will be fine.
Trim Frequency Trim nails every three to four weeks or when you hear them clicking on the floor. Some dogs wear their nails down naturally if they walk on concrete, but most need regular trims.
The Dew Claw Don’t forget the dew claw. This nail is on the inside of the front legs. It doesn’t touch the ground so it grows longer. Trim it when you trim the other nails.
Cleaning Your Dog’s Ears at Home
Ear care prevents infections and keeps your dog comfortable.
Check Ears Regularly Look inside your dog’s ears once a week. Healthy ears are pink and clean with just a tiny bit of wax. Brown or yellow discharge means you need to clean them.
Gather Supplies Get cotton balls, not cotton swabs. You’ll also need a dog ear cleaning solution from your vet or pet store. Never use vinegar or alcohol without asking your vet first.
Apply the Solution Squeeze a small amount of ear cleaning solution into the ear canal. You don’t need much. Massage the base of the ear for about thirty seconds. This helps the solution break up the wax and debris.
Let Your Dog Shake Step back because your dog will shake their head. This is normal and helps move the debris out. Have a towel ready to catch the spray.
Wipe Out the Debris Use a cotton ball to gently wipe the inside of the ear. Get out any visible debris. Be gentle and don’t push the cotton ball deep into the ear.
Watch for Problems If your dog’s ears smell bad, have redness, or your dog keeps scratching, call your vet. These signs might mean an ear infection that needs medicine.
Floppy Ear Dogs Dogs with long ears like Cocker Spaniels need ear cleaning more often. The long ears trap moisture and warmth, which helps bad bacteria grow. Clean these ears weekly.
Brushing Your Dog’s Teeth Daily
Dental care is just as important for dogs as for humans.
Get a Dog Toothbrush Pet stores sell toothbrushes made for dogs. They have softer bristles and different shapes than human toothbrushes. A finger brush works too. You just slip it over your finger.
Buy Dog Toothpaste Never use human toothpaste on your dog. Human toothpaste has ingredients that can make dogs sick if swallowed. Dog toothpaste comes in flavors like poultry and peanut butter.
Make It Fun Let your dog lick the toothpaste off your finger first. It tastes good to them. Then slowly introduce the toothbrush.
The Brushing Method Hold the brush at a 45-degree angle to the teeth. Use gentle circular motions. Focus on the outer surfaces where plaque builds up. You don’t need to brush the inside surfaces as much. Most dogs won’t let you brush the inside anyway when you’re starting out.
Time It Right Brush teeth daily if you can. At least three times a week makes a real difference. Even brushing two or three times a week is better than nothing.
Signs of Dental Disease Watch for bad breath, yellow or brown buildup on teeth, red gums, or pawing at the mouth. These signs mean you should visit the vet.
Trimming Your Dog’s Fur Safely
If your dog has a longer coat, learning to trim fur at home is handy.
Know Your Dog’s Breed Different breeds need different haircuts. Some dogs should never be shaved because their coat protects them from heat and cold. Research your breed before you start cutting.
Start with a Bath Bathe and dry your dog completely before trimming. Never cut wet fur. It’s harder to see what you’re doing, and the results look uneven.
Invest in Quality Clippers Good clippers make a huge difference. Poor quality clippers pull fur and hurt your dog. Read reviews before buying.
Trim Problem Areas First Start by trimming around the ears, paws, and face. These areas need regular trimming and are easier than doing the whole body.
Work Slowly and Carefully Stretch the skin gently as you work. Move the clippers in the direction the fur grows. Take breaks so your dog doesn’t get too tired or stressed.
Ask a Pro First If you’re nervous about trimming, have a professional groomer do it once. Watch closely and ask questions. Then you can maintain the cut at home between professional visits.
Making Grooming Time Stress-Free
A relaxed dog makes grooming easier for everyone.
Start Young If you have a puppy, introduce grooming early. Puppies get used to it quickly. Adult dogs can learn too, but it takes more patience.
Use Treats and Praise Reward your dog during grooming. Offer tiny treats and say nice things. Make it a positive experience.
Keep Sessions Short A ten-minute grooming session is better than a stressed-out thirty-minute one. Build up slowly.
Watch for Stress Signs A stressed dog pulls away, trembles, whines, or snaps. If your dog shows these signs, stop and try again later. You’re building a routine, not forcing it.
Talk Calmly Your dog reads your energy. Stay calm and speak softly. If you’re nervous, your dog will be nervous too.
Create a Routine Groom your dog on the same day each week. Dogs love routines. They start to expect grooming time and stress less.
Common Grooming Problems and Solutions
Matted Fur Prevention is easier than cure. Brush regularly to stop mats before they start. For existing mats, work gently and use a mat splitter tool. If the mat is too close to the skin, you might need a professional groomer’s help.
Fear of the Dryer Not all dogs like the blow dryer sound. Towel dry your dog instead. Wet dogs aren’t dangerous or unhealthy. They just need time to dry.
Sensitive Paws Some dogs hate having their paws touched. Work on this during non-grooming time. Touch and massage the paws while your dog relaxes. Make it normal and rewarding.
Aggressive Behavior If your dog gets aggressive during grooming, stop and call a professional trainer or groomer. They know how to handle this. Your safety and your dog’s safety matter most.
Allergic Reactions to Shampoo If your dog gets red, itchy skin after a bath, switch shampoos. Try a hypoallergenic dog shampoo made for sensitive skin. Your vet can recommend brands.
Tools That Save Time and Money
Mat Splitter This tool cuts through mats without pulling. It makes grooming matted coats much easier.
Undercoat Rake This tool removes loose undercoat fur without damaging the top coat. It cuts grooming time in half for double-coated dogs.
Grooming Table A table with an adjustable height saves your back. Your dog stays in one place while you work.
Grooming Loop This loop holds your dog still so you have both hands free to groom. It keeps your dog safe from falling.
Nail Grinder Some people prefer a grinder instead of clippers. It smooths the nail edges and is gentler. Your dog might find the sound scary though.
Grooming Schedule: How Often to Groom Your Dog
The answer depends on your dog’s coat type and breed.
Short-Haired Dogs Brush once a week. Bathe once a month or when they get dirty. Trim nails every three to four weeks.
Medium-Haired Dogs Brush two to three times a week. Bathe every four to six weeks. Trim nails every three to four weeks.
Long-Haired Dogs Brush three to four times a week or daily. Bathe every four to eight weeks. Trim nails every three to four weeks.
Double-Coated Dogs Brush three to four times a week. Bathe every six to eight weeks. During shedding season, brush daily. Trim nails every three to four weeks.
Special Coats Dogs with curly or wiry coats need more grooming. They might need professional grooming every six to eight weeks to stay neat.
When to See a Professional Groomer
Sometimes you need professional help. It’s okay to ask for it.
Complex Haircuts If your breed needs a specific cut that takes skill, let a pro do it. You can maintain it at home between visits.
Aggressive or Anxious Dogs Professionals know how to handle difficult dogs safely. Don’t put yourself or your dog at risk.
Health Issues If your dog has skin conditions or injuries, ask your vet for advice. A pro groomer can work around these issues better than you can.
Sanitation Concerns Professional grooming facilities have proper equipment to sanitize tools. If you worry about cleanliness, professional grooming is worth it.
Tips for First-Time Groomers
You’ve got this. Here’s what first-timers should remember:
Start with One Task Don’t try to bathe, trim nails, and cut fur on the first day. Start with brushing. Master one skill before moving to the next.
Watch Videos YouTube has tons of dog grooming tutorials. Watch a few before you start so you see what it should look like.
Ask Your Vet Your vet can show you how to trim nails or clean ears during a visit. Many vets are happy to demo the right technique.
Don’t Rush Grooming takes practice. Your first attempts might be messy or take a long time. That’s normal. You’ll get faster and better.
Keep Your Dog Healthy Grooming isn’t just about looks. It’s health care. Healthy skin, clean ears, and good dental hygiene keep your dog feeling great.
Be Patient with Your Dog Your dog is learning too. Every grooming session teaches them something new. Patience and kindness make all the difference.
Final Thoughts on Home Dog Grooming
Grooming your dog at home is totally possible. You don’t need to be a professional. With the right tools, a calm approach, and practice, you can keep your dog looking and feeling great. Start small, take your time, and celebrate small wins. Your dog will appreciate the extra time together, and you’ll save money while bonding with your pet. The best part? Your dog will be cleaner, healthier, and happier because you took the time to learn how to groom them properly. Get started today, be patient with yourself, and enjoy the journey.
Hi, I’m Mary, the founder of PetGadgetPro.com. I’m a passionate pet lover with a special place in my heart for dogs and cats. I share practical advice and honest insights on pet gear to help pet parents make better choices. My dedicated research team studies products in depth, and our writers create reviews using trusted, authentic sources—so you can feel confident choosing the best for your pets.